Build Sleek Floating Shelves with 3/8″ Threaded Rod: A 2025 Woodworking Favorite


Minimalist floating shelves are dominating DIY and interior design searches this year—and for good reason. They’re stylish, space-saving, and surprisingly simple to build. Whether you’re upgrading your home office, organizing your kitchen, or adding flair to a cozy reading nook, this project delivers both form and function.

 Why Floating Shelves Are Trending in 2025

• Modern aesthetic: Clean lines and open space are in. Floating shelves offer a clutter-free look that complements any room.

• DIY-friendly: With basic tools and a few boards, you can create a custom shelf in a weekend.

• Versatile use: Display plants, books, collectibles, or kitchen essentials—these shelves adapt to your lifestyle.

• Sustainable appeal: Woodworkers are embracing reclaimed and eco-friendly materials, making shelves both beautiful and responsible.

 Materials & Tools You’ll Need

• Solid wood board (maple, oak, pine, or reclaimed wood)

• 3/8″ threaded rod (cut to 5–6″ lengths)

• Epoxy or construction adhesive

• Drill with 3/8″ bit

• Stud finder, level, tape measure

• Sandpaper (120–220 grit)

• Wood stain or paint

Optional upgrades:

• Router for edge detailing

• LED strip lighting for ambiance

 Step-by-Step Build Guide

1. Measure your space

Decide shelf length and depth based on wall placement and intended use.

2. Cut and prep your boards

Sand edges smooth and apply your chosen finish.

Side-view diagram showing a 3/8-inch threaded rod inserted 2 inches into a wall stud and halfway into a wooden shelf board, illustrating the hidden bracket method for floating shelves.
DIY Floating Shelf Tutorial Build minimalist shelves with hidden brackets using 3/8″ threaded rod. Perfect for modern homes, small spaces, and weekend projects.

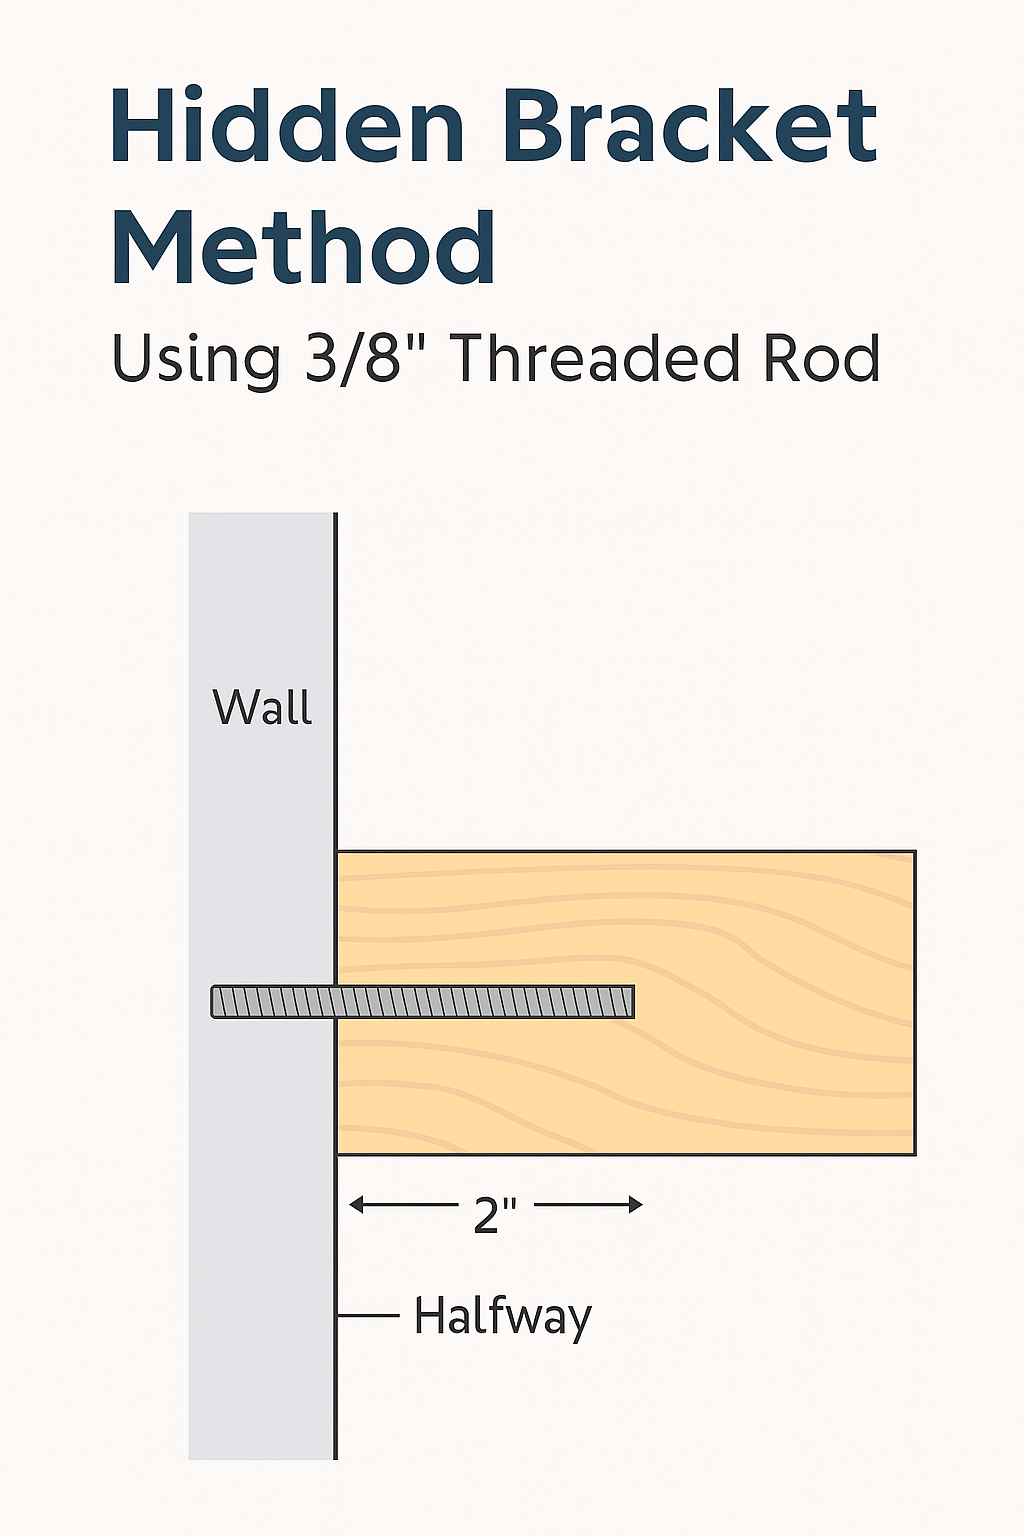
3. Drill into the wall stud

Use a 3/8″ drill bit to bore a 2″ deep hole into the stud. This anchors the rod securely.

4. Insert threaded rod

Apply epoxy and insert the rod, leaving 2.5–3″ protruding from the wall.

5. Drill matching holes in the shelf

On the back edge of the shelf, drill 3/8″ holes halfway through the board to match the rod depth.

6. Mount the shelf

Slide the shelf onto the rods. Add epoxy inside the holes for extra grip. Use a level to ensure alignment.

7. Style it up

Add decor, books, or plants to bring your shelf to life.

 Pro Tips from SmartWoodCrafts

• Use a router to add a subtle chamfer or round-over edge for a polished look.

• For a rustic vibe, distress the wood with chains or wire brushes before staining.

Here are some standout decorative and functional enhancements you can incorporate into your shelf builds:


 1. Integrated LED Lighting

• Add recessed LED strips along the underside or back edge of the shelf.

• Use warm white or dimmable RGB lighting to create ambiance.

• Great for kitchens, reading nooks, or nighttime display zones.

• Conceal wiring inside a routed channel or behind the shelf board.

 2. Mixed Materials

• Combine wood and metal for a modern industrial look.

• Use live edge slabs for a natural, organic feel.

• Try glass inserts or resin pours for artistic flair.

• Add leather strap supports for a rustic or boho vibe (even if decorative only).

 3. Asymmetrical Layouts

• Stagger shelf heights or lengths for visual interest.

• Create a zigzag or cascading pattern across the wall.

• Use offset spacing to highlight specific decor pieces.

 4. Corner-Mounted Shelves

• Turn unused corners into functional display zones.

• Use L-shaped or triangular boards for tight spaces.

• Great for bathrooms, hallways, or small kitchens.

 5. Built-In Planter Grooves

• Route a shallow groove into the top surface to hold small succulents or herbs.

• Add a waterproof liner or use air plants for low maintenance.

• Perfect for kitchen shelves or sunlit living rooms.

 6. Floating Shelf Frames

• Build a frame around the shelf to mimic a shadow box or picture ledge.

• Ideal for displaying art, photos, or collectibles.

• Adds depth and structure to minimalist designs.

 Pro Styling Tip

Use neutral tones and matching containers to keep the shelf visually clean. Group items in odd numbers (3 or 5) and vary height and texture for balance.


Leave a Reply

Your email address will not be published. Required fields are marked *

4 responses to “Build Sleek Floating Shelves with 3/8″ Threaded Rod: A 2025 Woodworking Favorite”

  1. Cian Avatar
    Cian

    This is an absolutely brilliant tutorial! I’ve been looking for a modern, sturdy method for floating shelves, and the use of 3/8 threaded rod is pure genius. Your step-by-step instructions are incredibly clear, and the photos really help visualize the process from start to finish. I especially appreciate you highlighting why this is becoming a 2025 favorite—it’s the perfect blend of industrial strength and minimalist design.

    I’m planning to tackle this project for my home office. For finishing, would you recommend applying a wood conditioner before staining for a more even color on pine, or does the sanding technique you described typically prevent any blotchiness? Thanks for sharing such a comprehensive and inspiring guide!

    1. William Mann Avatar
      William Mann

      Thank you for reading this article. It is a great way to hold the floating shelves. This just makes sense. It provides excellent support, completely hidden, you know its in the stud. The only drawback is if the shelf is not long enough to reach the second stud. I recommend the wood conditioner for pine to ensure to decrease the chance of blotchiness. Sanding will definitely help but I still recommend conditioner.

  2. Alexa Avatar
    Alexa

    This post couldn’t have come at a better time! My husband is currently working on installing floating shelves in both my home office and our living room to help us save space and add a clean, modern touch. It’s been such a fun project to plan together; he’s handling the build, and I’m dreaming up how to style them!

    I love how versatile these shelves are. In my office, I’m hoping to display a mix of books, small plants, and maybe a few framed quotes for inspiration. And in the living room, we’re thinking of adding some LED strip lighting underneath for a cozy evening vibe.

    The idea of built-in planter grooves is genius, especially for someone like me who loves greenery but doesn’t want clutter. Have you found any favorite wood finishes or styling combos that work well in multi-use spaces like offices and living rooms?

    Thanks for all the tips and inspiration; it’s making this DIY journey feel even more exciting!

    1. William Mann Avatar
      William Mann

      I want to thank you so much for the kind review. I am so glad I was able to give you some good ideas for you and your husbands project. Projects you complete together are so much more fun and special because you did do them together! The Leds under the shelves are so nice and put out just the right amount of light, and you can get the kind you can change the color if you choose.

      If you choose to use the 3/8″ threaded rod mount, ensure you watch the depth of the holes for the planters if they are close to the drilled holes for the rods. To answer your question, I am a fan of stain and then finished with (PURE) Tung Oil. You can use Polyurethane or Shellac, however you do not get the protection like you do with PURE Tung Oil. It has to be Pure. If it does not say pure then it is not going to give the beautiful shine and protection like you get with Pure Tung Oil.(My Opinion)

      I will say it takes longer to finish them but in my opinion the finish shine and protection lasts so much longer. Watch if they are in direct sunlight all of the time, the shine and protection will deteriorate faster and need to be reapplied.

      Any style you like is good but I like the stair steps or offset shelves. I have seen some nice looking corner shelves where they meet at the corner, either inside corner both cut on 45 degree angles to meet in the corner. I really like when the corner is an outside corner.

      I hope this helps. I hope your husband does not get mad at me if I added any additional work because that is just my opinion.

Leave a Reply

Your email address will not be published. Required fields are marked *

4 responses to “Build Sleek Floating Shelves with 3/8″ Threaded Rod: A 2025 Woodworking Favorite”

  1. Cian Avatar
    Cian
    1. William Mann Avatar
      William Mann
  2. Alexa Avatar
    Alexa
    1. William Mann Avatar
      William Mann