PLEASE READ AFFILIATE DISCLOSURE
A floating bookshelf sounds pretty cool, right? It’s all about that sleek vibe, where your books look like they’re magically hovering against the wall. With no visible supports, this design fits right into modern spaces, making rooms feel airy and uncluttered.
People jump on the floating bookshelf bandwagon for lots of reasons. It saves space by eliminating bulky furniture pieces that shove into rooms and corners. If you’ve got a small nook or a vast empty wall, these shelves are like a stylish whisper asking to make the space both functional and good-looking. Plus, they give you a chance to show off your personality with how you display your bits and bobs.
Now, how does one get these shelves up and floating like pros? Well, it’s more than just screwing a bit of wood to the wall. We’re talking creativity, careful measuring, some sweat, and a little elbow grease. We’re gonna dive into everything from picking the right tools and materials to the final touches that make your bookshelves not just a place for books, but a feature that lifts the whole room’s look.
Tools and Materials Needed
Building your own floating bookshelf kicks off with loading up your toolkit. Trust me, the right gear makes all the difference between a Saturday afternoon project and an all-weekend headache. We’re talking drills, screws, saws of all shapes and sizes, and maybe even a tape measure or two. Get these A-Team tools together, and you’re well on your way to DIY glory.
Materials matter too, big time. Your shelf’s backbone could be wood, which brings warmth and style, or maybe sleek metal brackets if that’s your vibe. Even invisible mounts get in the mix for that full-on floating effect. But don’t just grab the first thing you see at the hardware store—think about durability and the weight those shelves gotta hold.
Let’s not forget safety, ‘cause we wanna keep all our fingers intact! Safety goggles protect your peepers when cutting wood, and dust masks save your lungs from ugly sawdust inhalations. Having basic gear like gloves is a no-brainer when you’re dealing with splinters and sharp edges.
Once you’ve got the essentials covered, give a thought to any unique tools your particular bookshelf design might require. This way, no surprise run to the store will derail your crafting groove.
Planning and Designing Your Floating Bookshelf
The blueprint stage is where your vision starts coming to life. Think about what space you’ve got and what you want from it – are we talking a slim row for your favorite reads or a grand display for books and plants? Grab that measuring tape: room width, height, and the depth you fancy all matter. Once you have the dimensions down, you can tailor a shelf that fits like it was destined to be there.
Next, the fun part: sketching your design. Whether you’re into minimalist, contemporary vibes or a more rustic charm with reclaimed wood, your shelf’s style should match your personal flair and home decor. Remember, balance is key. A wall-mounted, modern fixture can hold its own as a statement piece or blend in seamlessly, letting your treasures take the spotlight.
Weight distribution plays a huge role, so don’t forget it! Well-made shelves need solid support. Keep an eye on the studs behind your drywall for the most secure installation. Missing this step could lead to more than just a bumped head.
While design speaks to your style, its foundation in practical planning keeps everything rock solid. Consider potential wall obstacles like sockets, pipes, and windows—their locations might adjust where the shelf hangs. By preemptively figuring out these factors, you’re setting yourself up for smooth sailing down the road.
Constructing the Wooden Panels
Choosing the right wood type kicks off this phase. Pine, oak, or walnut each bring their own vibe to the party. Pine is light and budget-friendly, oak offers durability, and walnut has rich color for that really upscale look. Pick what best aligns with your style and wallet.
Once the wood is picked, it’s time to whip out the saws. Cutting the panels to your desired dimensions is where precision counts. Use a straight edge or a cutting guide to keep those lines crisp and true to your design sketch. Trust me—clean cuts make your life way easier during assembly.
Sanding is up next, smoothing out rough edges and prepping for finishing. Grits range from coarse to fine, starting gritty to tackle big imperfections, then easing into ultra-fine to get that silky feel touch. And don’t skip this step! Sanded wood not only looks better, it’s a dream for painting and staining later.
Prepping isn’t just about gorgeous finishes. Holes for mounting need careful drilling, too. Mapping out where screws and brackets fit ensures stable assembly. Double-check your measurements—missteps can lead to misalignment, and nobody wants a wonky shelf! By having a clear focus during construction, you’re setting the stage for a floating shelf that’s sturdy and ready to shine.
Securing Mounting and Support Structure
“Getting the mounting and support part right is crucial.” Anchors and brackets need to be solid because this is where your shelf’s durability takes root. Invisible mounts bring that floating illusion to life, so if that’s your goal, selecting high-quality ones is non-negotiable.
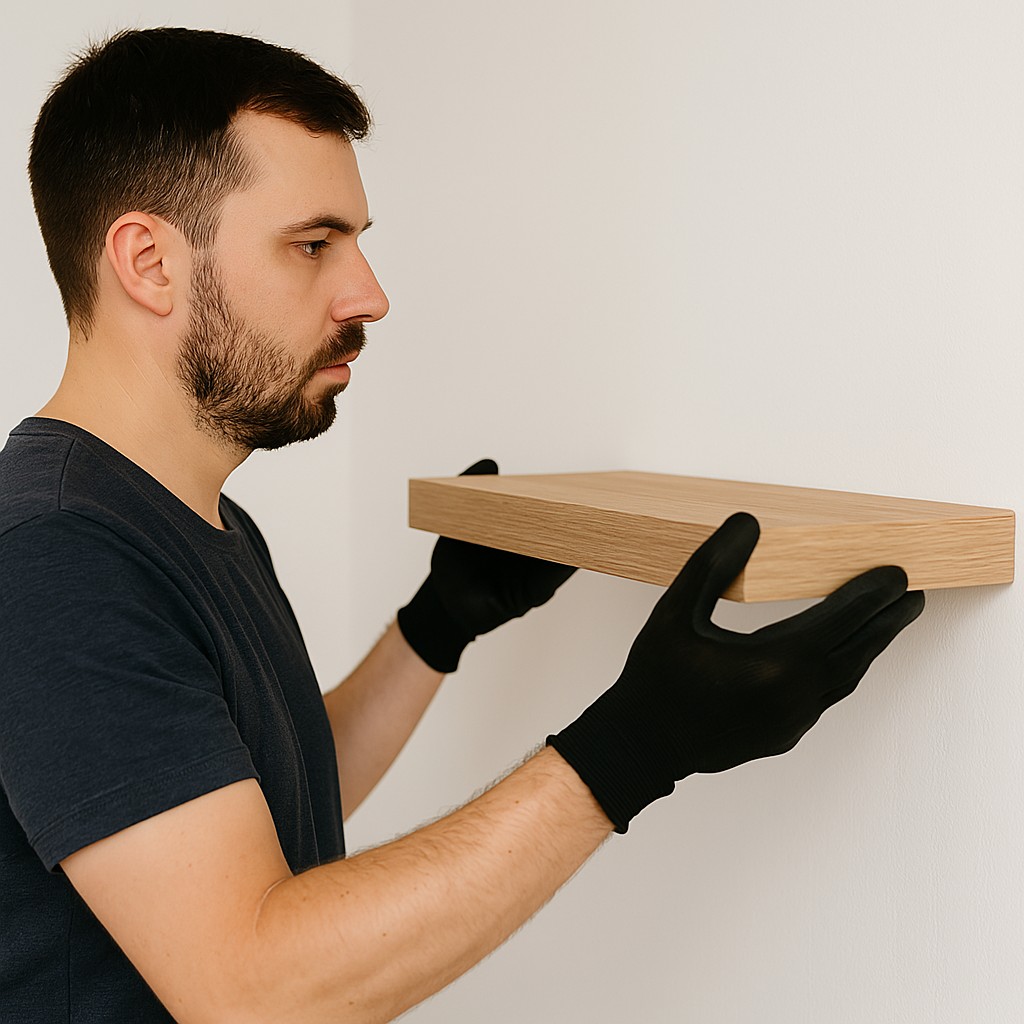
Installing the mounts might seem tricky, but with the right steps, even a newbie can nail it. Start by marking your spots clearly on the wall. Use a level to ensure everything’s lined up perfectly. No one wants a shelf that looks like it’s on a rollercoaster!
All about weight distribution, remember? Make sure those invisible mounts or brackets are anchored into wall studs wherever possible. If studs are out of reach, heavy-duty wall anchors are your new best friends. They provide a firm grip and peace of mind when you load up your shelf with books and decor.
A successful installation depends on the perfect alignment. Double-check your setup before making any permanent decisions. The brackets need to carry the weight while the mounts add that seamless aesthetic. It all clicks when everything’s correctly aligned.
The hidden brackets must be tight and secure, yet subtle. This ensures an uninterrupted wall-to-shelf flow, contributing to that magic floating effect. With time and care taken here, your structure will stand the test of time.
Final Assembly and Installation
It’s go-time for putting all those pieces together, bringing your dream shelf into reality. Start by assembling any pre-cut and sanded pieces based on your design. A snug fit is key here; checking that corners align perfectly means it’ll look top-notch when it’s up and running.
Next, attach your shelf framework to those carefully installed mounts or brackets. It’s all about execution now, using steady hands and a level to make sure everything stays true to your original plan. Leveling is like the final boss of assembly—run that bubble level across the length of your shelf to catch any wonkiness.
Wanna keep that floating magic intact? Pay attention to detail during installation, making sure the brackets or mounts remain out of sight. If the hardware is hidden just right, your shelf will give that oh-so-cool levitating vibe your friends will envy.
Once it’s mounted, give it a few nudges and tests with your hands to ensure nothing wobbles. Better now than when it’s fully loaded, right? Detecting issues early makes solving them straightforward—tighten where needed and double-check anchor points.
Even with the best planning, unexpected hurdles might pop up. Common challenges could include uneven walls or slightly misaligned mounts, but patience here goes a long way. Small tweaks and adjustments can happen without compromising your sturdy setup.
Conclusion and Maintenance Tips
You’ve made it! A fully functional floating bookshelf ready to handle your favorite novels, art pieces, and quirky decorations. Setting up was one part precision, one part creativity, and definitely a pinch of patience. Now, it’s time to keep this masterpiece looking fresh and sturdy for years.
Maintenance is where the magic continues. Dust accumulates faster than you think, so regular clean-ups with a soft cloth or feather duster will keep those shelves looking top-notch. Avoid harsh cleaners that might damage finishes—a simple wipe down usually does the trick.
While these shelves are built to last, periodic checks can’t hurt. Inspect the brackets and mounts every so often to ensure everything stays tight and secure. If you sense any looseness, a couple of twists with a screwdriver will handle it.
Styling is the cherry on top. Arrange and rearrange your books and decor to reflect the seasons, your latest finds, or just what vibes you’re going for that week. Plants, art, or even your favorite travel souvenirs can transform your shelves into a living, ever-changing gallery.
Enjoy the ode to your hard work—a blend of practicality, style, and your unique charm. Whether centered around showcasing collector’s editions or personal mementos, your floating bookshelf will remain an admired feature in your home.
How to make floating shelves, with invisible brackets
Leave a Reply